Dev's notes

macOS & Linux tweaks, hacks, and some random thoughts

🔉 Apple HomePods Mini as a stereo system: my honest review

I love Apple products for their aesthetics, build quality, great software and ecosystem. However, even great products have their limitations and it’s good to remember that.

So far, using HomePods Mini is my worst hi-fi experience to date. Relatively small speaker designed to be a standalone device in a proprietary ecosystem with the only AirPlay interface – hmm, what could go wrong?

Let’s talk about the pros first: the sound is really decent, especially for its small dimensions. They won’t give you the same sound stage as a pair of good hi-fi bookshelf speakers, but I’m well aware that there aren’t many alternatives for this price, sound quality and size on the market. Excellent detail with a bright sound focused on the mid and high frequencies. They even support Hi-Res audio! The HomePod can also act as a HomeKit server and has a few sensors inside. Finally, they can work in stereo pair.

The last feature listed gave me the idea of using them as a desktop stereo system. I already have a lot of Apple devices, so it should be easy to integrate them into the ecosystem, they look great, they’re compact, etc, etc. A great solution from every point of view... in a perfect world.

In reality, the stereo pairing is poorly implemented. One of the channels can randomly stop working for no reason, and only a restart of the HomePod will solve the problem. The sound is sometimes intermittent. This happens every day and couldn’t be fixed by improving the Wi-Fi network, speaker position or updates. So the overall experience is ugh... You just don’t expect such a controversial implementation from Apple.

Other drawbacks are introduced by a proprietary Apple Music integration. Spotify and others still play fine, but they are not natively integrated, so all the device’s sounds are played along with the music. And that delay... It is much more noticeable than the Bluetooth connection, which is not supported here.

This could have been easily fixed if HomePod had a physical sound interface like a mini-jack or USB-C, but Apple has been trying to reinvent the audio experience since the iPod era. And Apple has often succeeded: iPod, iTunes, AirPods and AirPods Pro – all of these products have changed the way we interact with music.

But in my opinion, Apple has not yet conquered home audio. And I think I know why: historically, home listening has been much more about physical interaction: plugging in wires, putting on a record, loading a CD or cassette. Even in a computer age, people still expect computer sounds to play without delay, even when listening to digital audio only.

In short, home audio has a richer history than personal audio, and it’s much harder to revolutionize. Apple suggests compromising experience with wireless sound in wired speakers (the HomePod Mini still needs to be plugged in). While the HomePod Minis are still great on their own, I would think twice before trying to use them as a compact replacement of Hi-Fi stereo system.

🌚 Kimsufi suddenly deleted my server

How it started

8 years ago I came across a low-budget server provider Kimsufi (by OVH) with extremely low prices for dedicated servers, starting as low as 5€/month. Five. Euros. Per month! For a dedicated server! Sure, they were selling those servers like hotcakes and it was hard to order one as they ran out in minutes. I had to set up an automatic page refresh in my Google Chrome to catch the free server. Those Intel Atom-based 5-euro-servers weren’t blazing fast, but their performance was enough to host some simple projects and even run virtual machines. So I moved all my sites and projects to this new server.

How it was going

A couple of years later, I ordered a much more powerful Kimsufi Intel Core i5 server for 16 €/month. And it worked very well since then. It hosted my page, this blog, my ownCloud, some bots for Telegram messenger, my university project with up to 2000 visitors per month, sites for my friends, and more...
How it ended

To keep a Kimsufi server working, a user must pay for the server upfront. I was doing this all 8 years, every month. Sure, sometimes I paid with delay for several days for some unexpected reasons – and these days server was offline. Not pleasant, but quite tolerable for me since I didn’t host any commercial projects on my server.

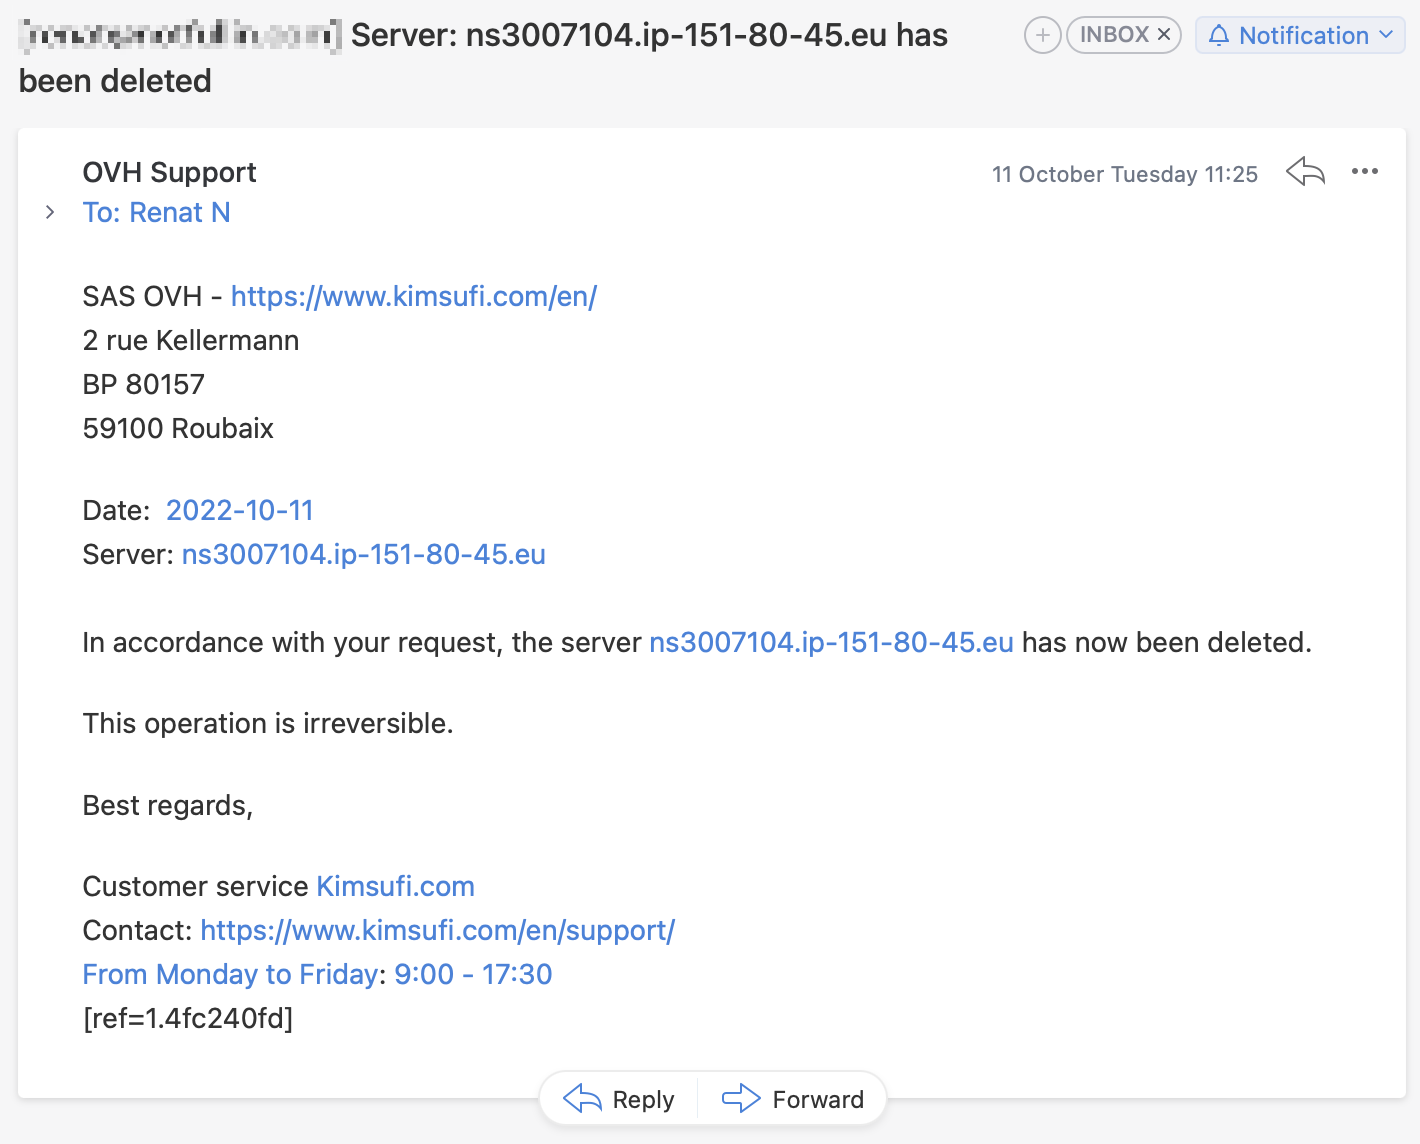
In October, I have trouble getting paid for reasons beyond my control. While I awaited my money transfer, I haven’t chances to pay for the server. The server was offline this time. I was quite sure that the server is “safely disconnected” from the global network, as many times previously... But it was not there. On October, 11, I received this ‘chain letter’, that my server has been deleted by my request (very interesting wording – of course, I didn’t request the server deletion. They just didn’t bother to make a different notification for that):

To be understood, I received 2 notifications:

  • 4th of October – payday,
  • 11th of October – postfactum notification about server deletion.

Between these days – 0 notifications, including last-time warnings, that server, and all its data are about to be wiped. Thus, I can suppose, that the payment grace period is 7 days or so. And yes, this information was not transparent at all – at least, it can’t be found either in the previous messages or in the account interface.
Is it my mistake?

It depends. Sure, as a customer, I must pay for services in a clear time frame. But what is this time frame? Was it clear? I’m not sure. Should a hosting provider warn before destroying the server with all data? Probably, yes. Looks like it’s a common courtesy to provide service with transparent terms.

By comparison, this is how many warning messages I got from Vultr since the last invoice that couldn’t be paid automatically:

How many messages did I get between payday and server deletion by Kimsufi? Saying it again – zero.
This approach sucks even if you provide low-budget solutions

I have a bad feeling, that this behavior is not a product mistake. Kimsufi is positioned as a super-low-budget solution in opposition to the parent company – OVH or even So You Start provider. I can’t be 100% sure, though, since I never tried these providers and will never do it now. But this is the only logic I can use to logically explain everything here:

You want friendly service? Oh, sorry – friendly service is not included in our low-budget solution. You could probably try our more expensive servers to get a better experience

Kimsufi was my friend for more than 8 years. As it turned out, the price of our friendship is 16 euros overdue by 7 days.
What I learned

Make backups. Always. Regularly. Your data does not belong to you until you host it on your own server in your own data center.
Unfortunately, some of my backups were too old. Others were missed. But I restored this blog and my personal page, and now I’m going to restore my university project and my friend’s sites. This will be an interesting and thorny journey, but this time Internet Archive, old backups, and forgotten experience with setting up old CMS will be my friends. 🚀

📷 How to shoot the Milky Way on iPhone 13 Pro and iPhone 14 Pro

Last weekend I could finally test the iPhone’s night photo capabilities. The night sky was clear and the Milky Way was slightly visible over my head.

I tried to shoot the Milky Way on my iPhone for the first time and here is my first result:

No stacking, no guiding, only built-in camera software and remote camera control from my Apple Watch (one can use a timer instead). To be honest, I was impressed. Did you?

Well, that’s not that easy. Here is how the photo was looked like before editing:

Slightly better than I could see with my own eyes – a good result, but a huge peace of magic should be made in photo processing software.

💡 Even photos made with professional DSLRs should be processed to get the best possible result.

Personally, I prefer Pixelmator Photo for iOS. This is a great one-time purchase alternative to Lightroom or similar software with a powerful set of coloring tools.

Shooting steps

To get started, point your camera at the Milky Way or just starry sky and hold your phone still (use tripod for the better fixation).

In Camera app, select main camera and select night mode with longest exposure available (10 seconds).

If the phone is stationary, exposure will be turned into max available – 30 seconds. Set timer or take a photo remotely from your Apple Watch Camera app.

Once done, if everything is ok, you have to do final step.

Processing photos – key points

Sure, you can spend hours, playing with all available settings to achieve the best possible result – and this could be surprisingly interesting.

However, there are 3 key settings which have the most impact on the result:

  1. Color temp
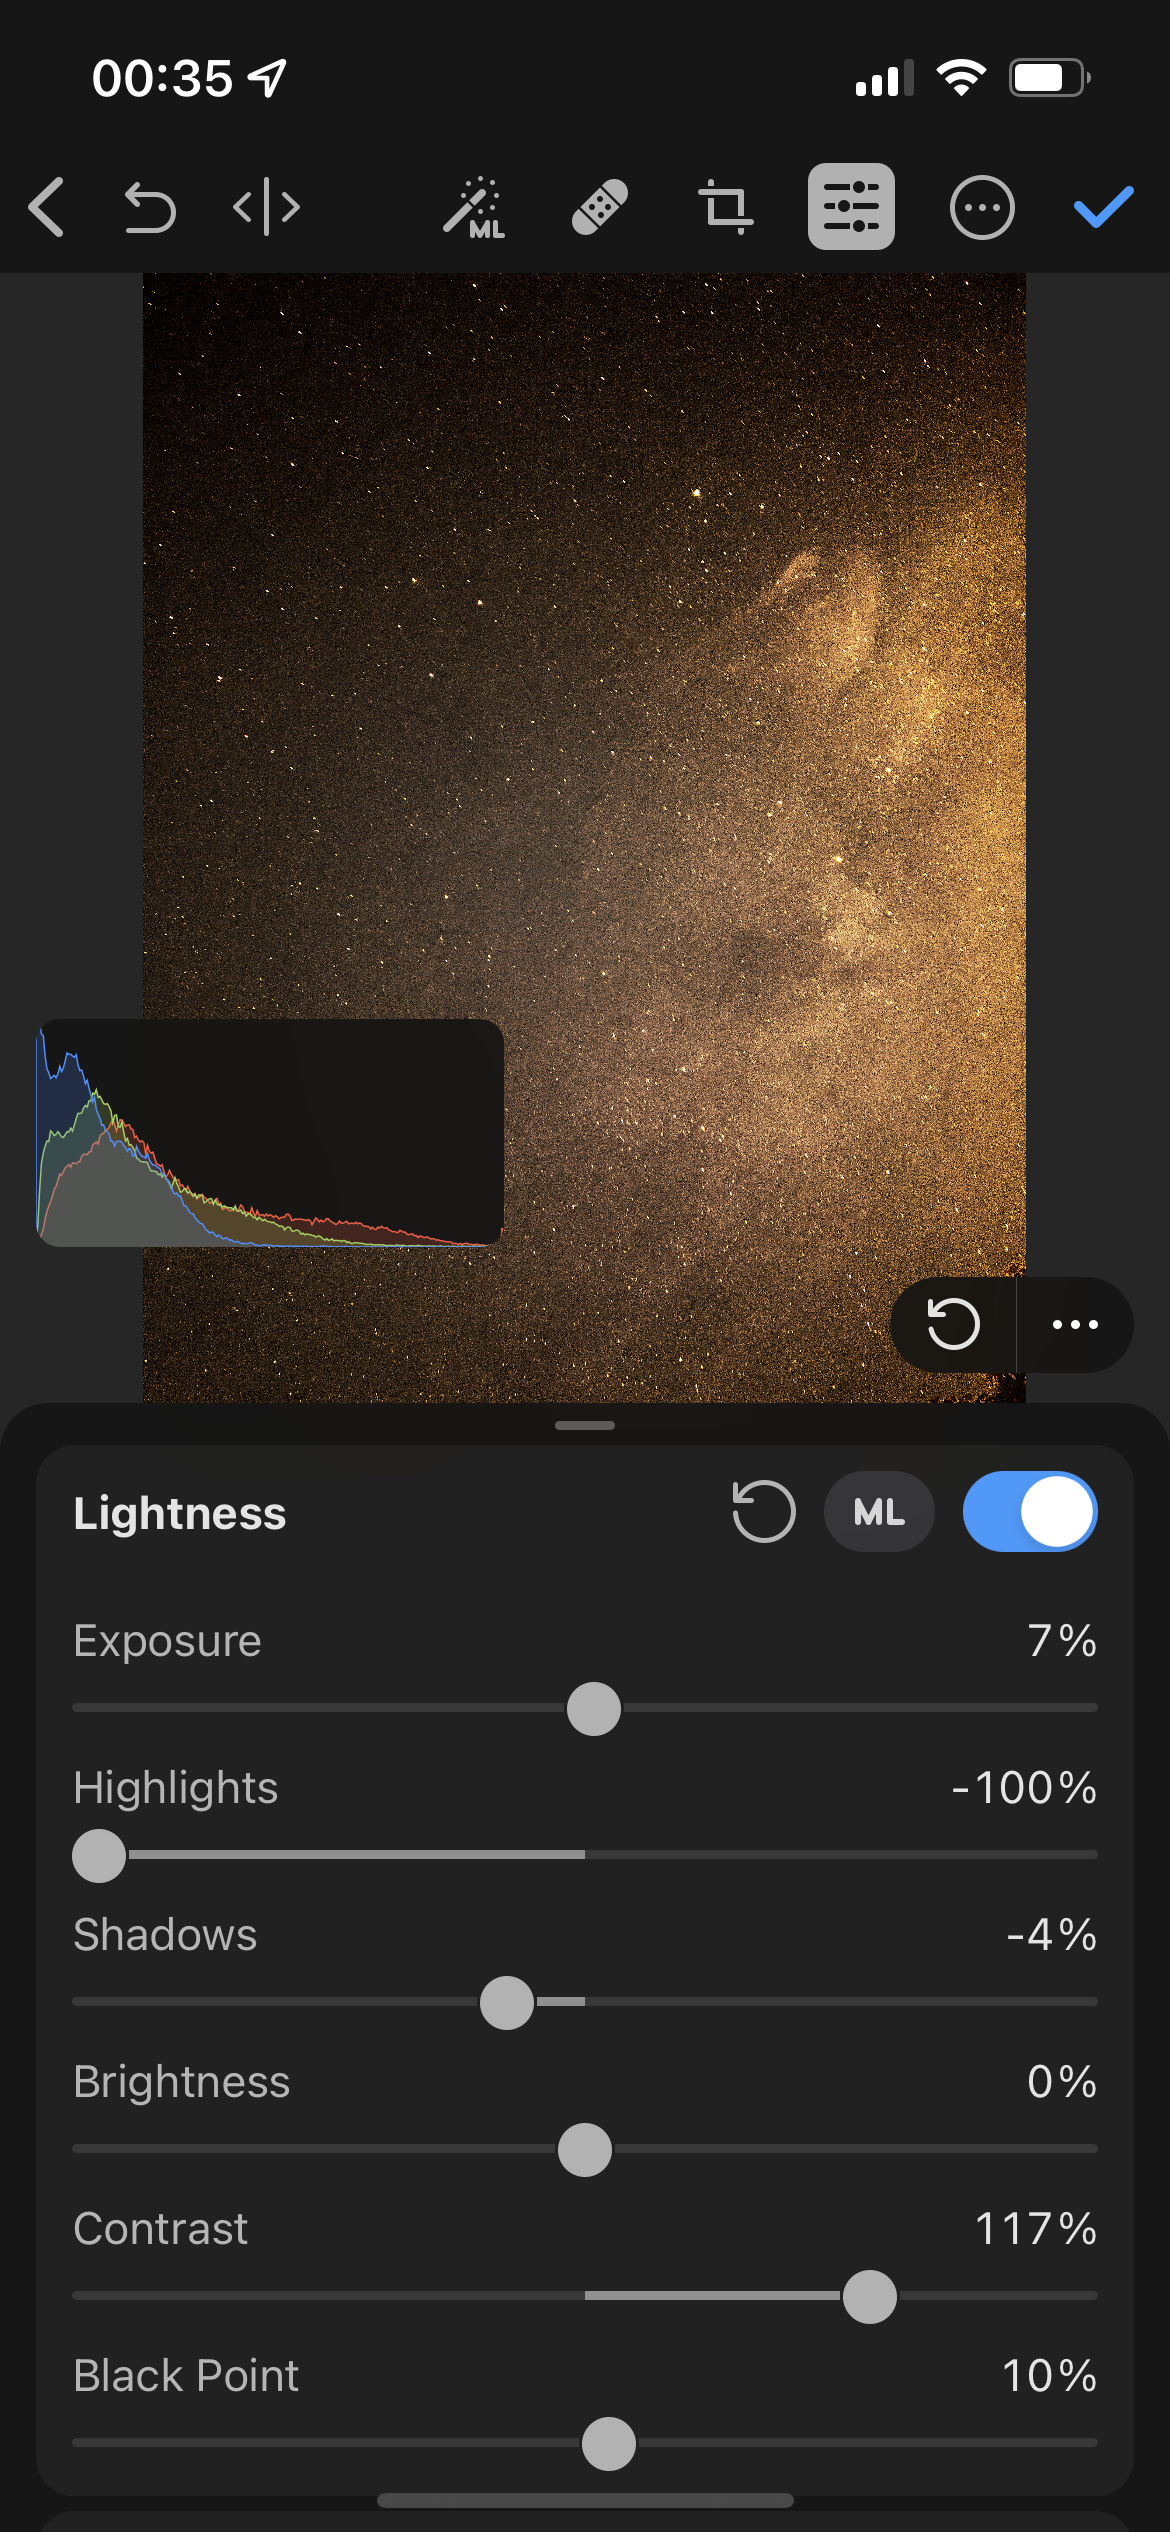
  2. Lightness settings
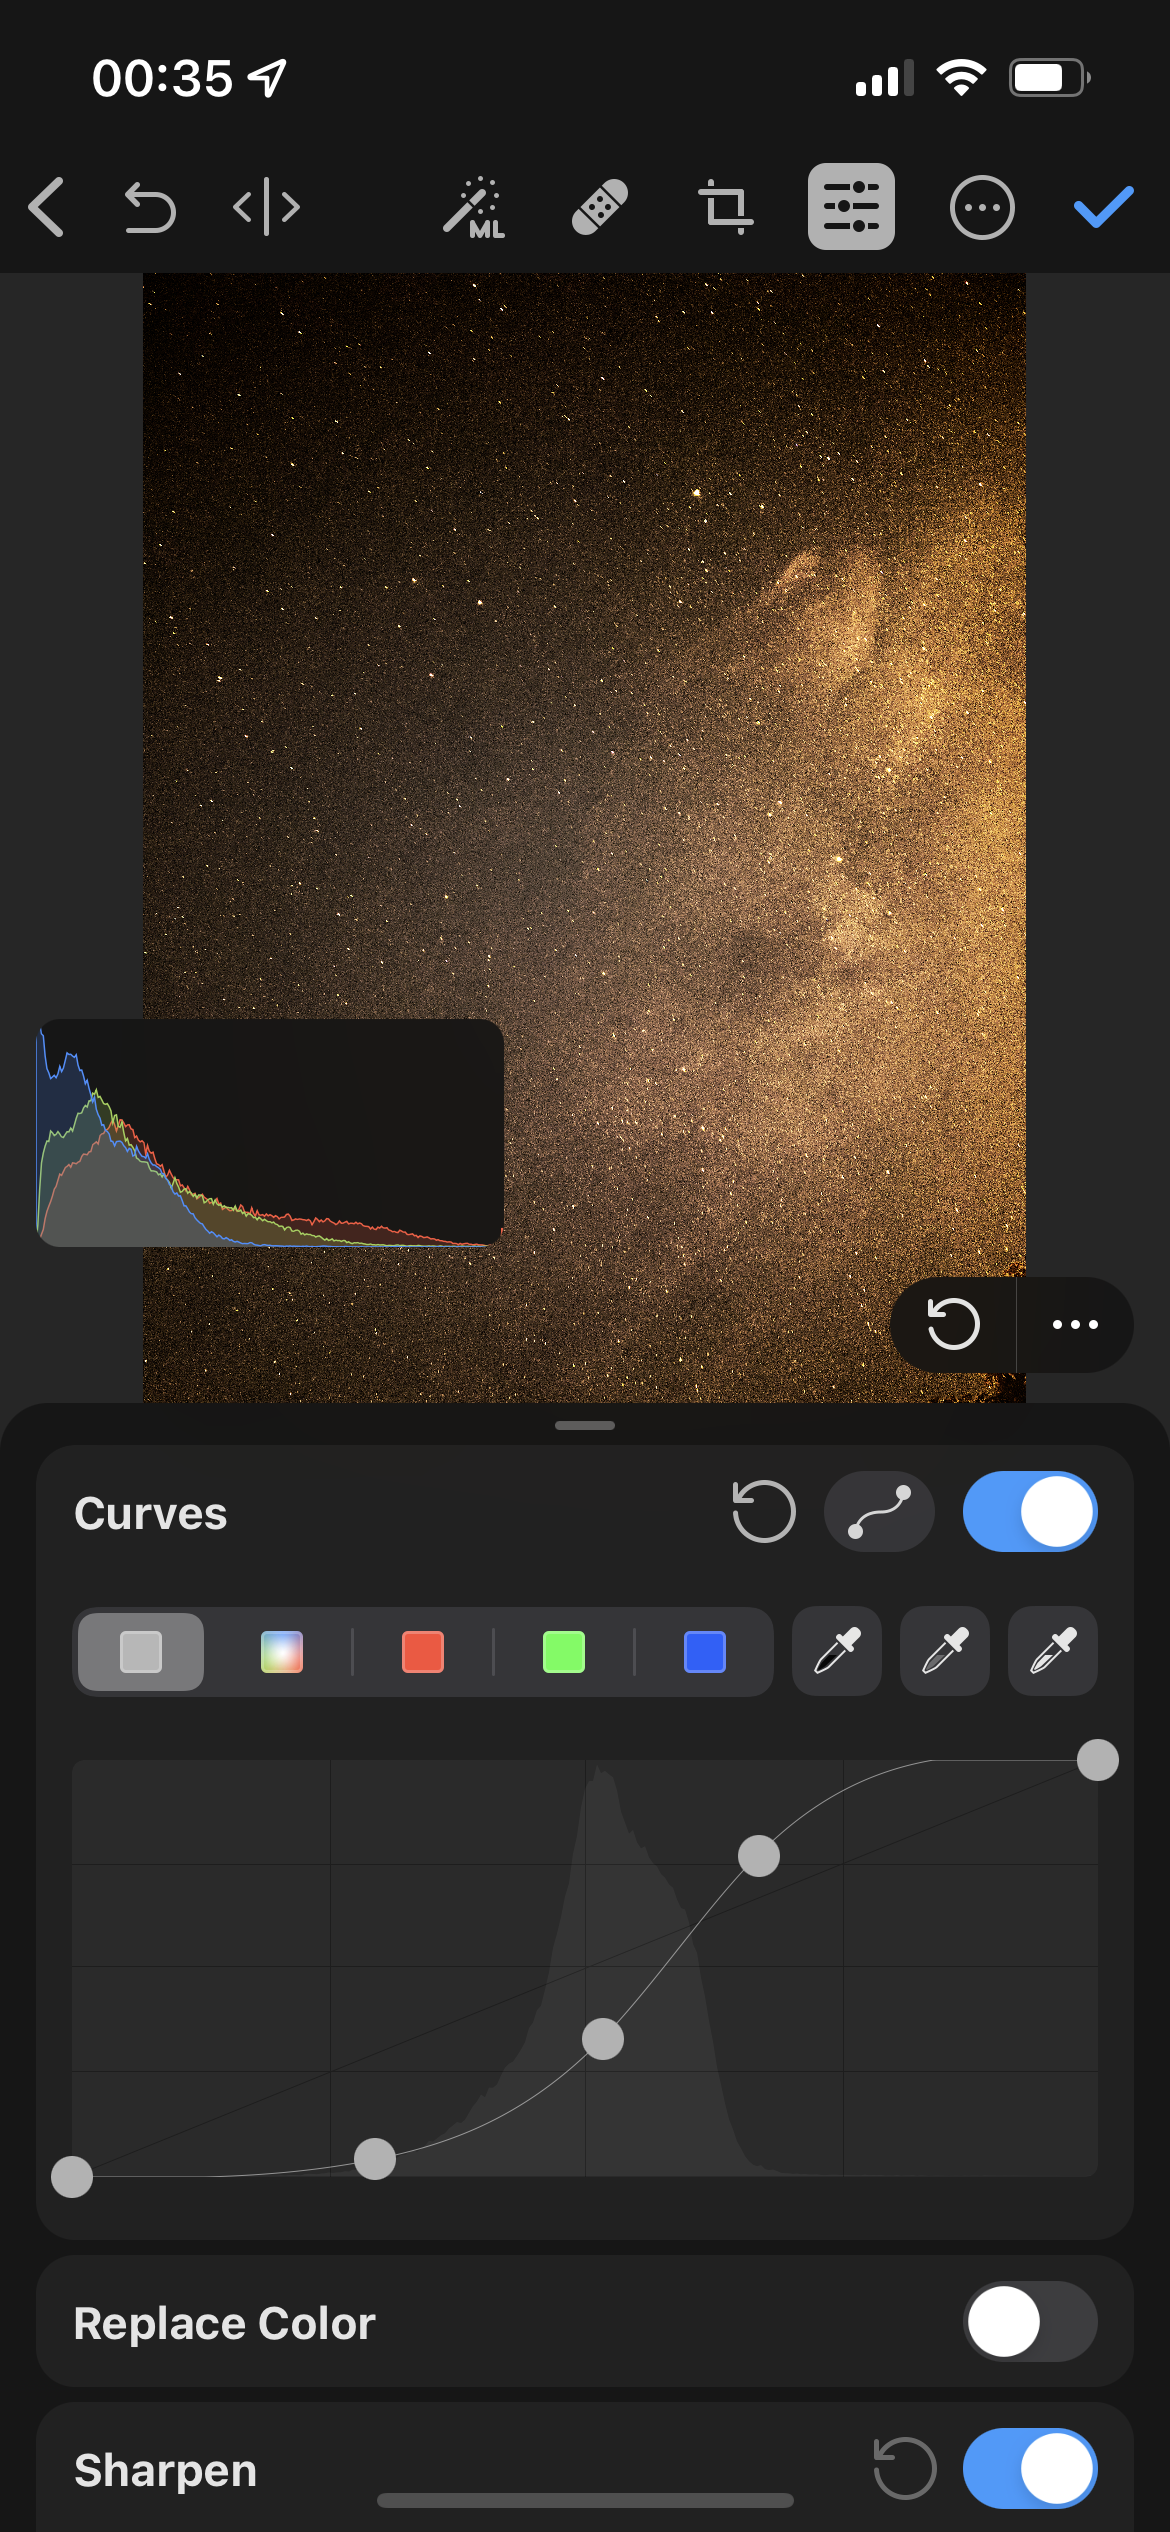
  3. Curves

I suggest changing Curves first, then tuning Color temp and Lightness settings. Here are some settings for reference:

In addition, it could be useful to make changes in Selective color if your photo has unwanted glow at the center.

Hope this guide was helpful! Feel free to download my Pixelmator preset and play around with settings.

🏞 Force macOS Photos.app to download whole iCloud library

Problem

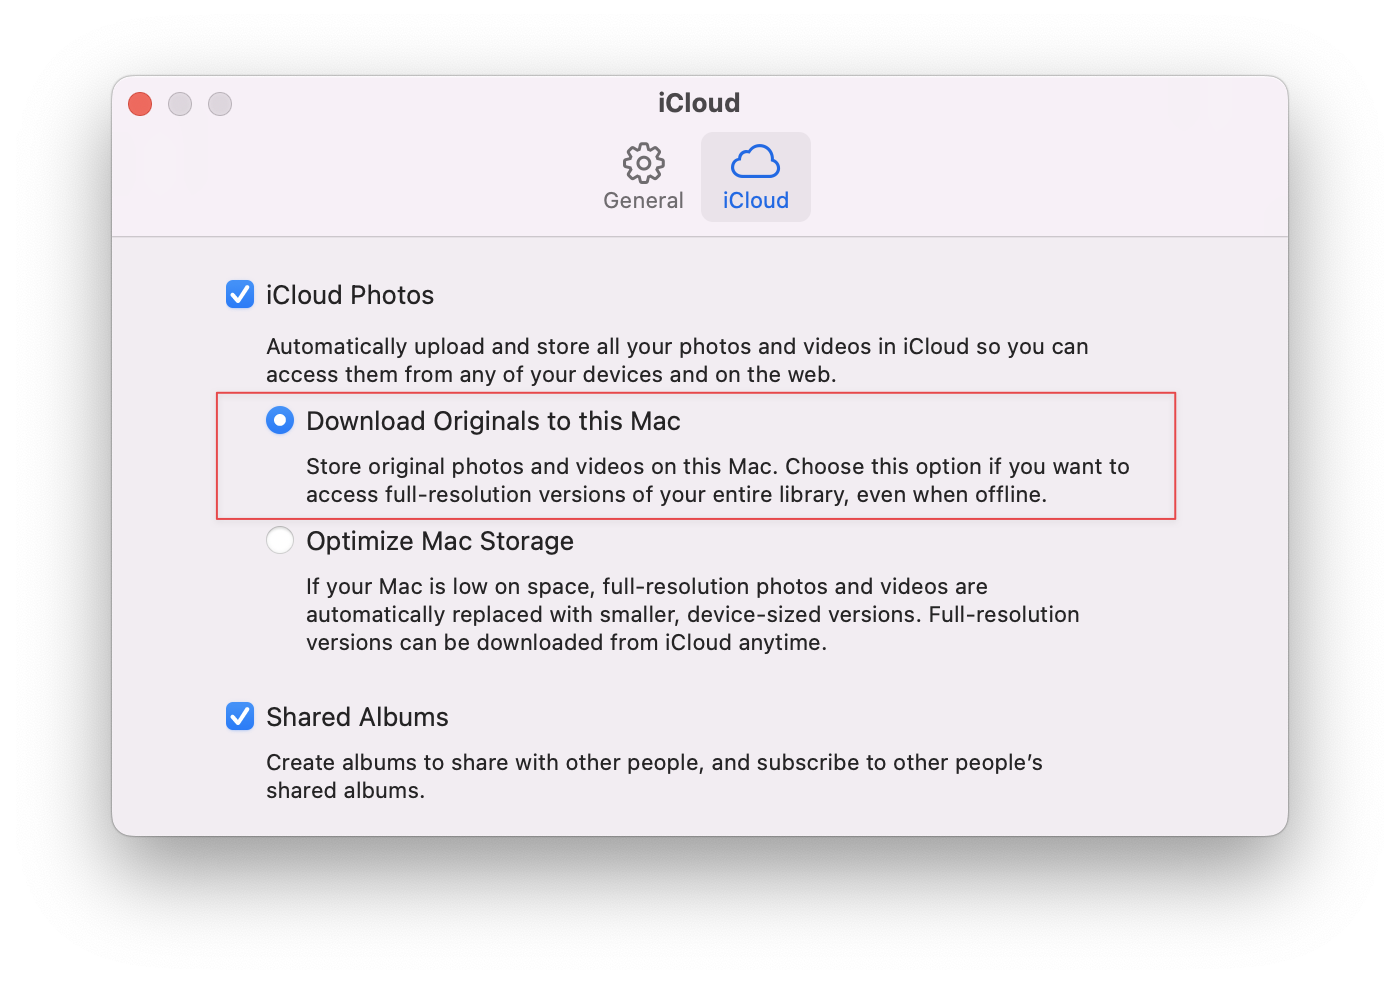
Many, many times I had issues with iCloud photos syncing. The last time I tried to save my whole Photos library (~180GB) on an external SSD drive with no luck: some originals for the latest photos were saved, while another 99% of data was still in the cloud only. What is important is that the settings were correct: I ticked ‘Download Originals to this Mac’, but this didn’t change anything.

It drove me nuts completely because I was planning to work with my new travel clip, so I needed all my photos and videos on hand, locally.

After many attempts to find a workaround, I realized that ‘smart’ algorithms mainly cause these issues, but not poor Wi-Fi/internet connection, or low bandwidth on iCloud infrastructure (ha-ha).

At the same time, I’m still not ready to use another cloud storage to save & sync my photo library. iCloud’s native look & feel and fair monthly prices are the benefits that still make me use it for a while.

Now I’m thinking about a pet project, that will allow me to force synchronization of the Photos library on my Mac using Apple Photokit. According to several forum threads, this app will be useful for many Apple users.

Solution

As for now, fortunately, I’ve finally found an easy way to download all my iCloud photos using 3rd party tool called osxphotos. This is a powerful command-line utility to work with your iCloud photos. It doesn’t have a special command like ‘store all my photos locally’, or ‘force sync all my photos with iCloud’, however, you can run an export command with specific attributes which will allow you to download all photos without actual exporting, and it works!

6 easy steps

  1. Open Terminal (search for Terminal in Spotlight or look in /Applications/Utilities)
  2. Download and install Homebrew – cool CLI package manager for Mac:
/bin/bash -c "$(curl -fsSL https://raw.githubusercontent.com/Homebrew/install/HEAD/install.sh)"
  1. Using Homebrew, download and install pipx – package manager for python:
brew install pipx
  1. Install osxphotos:
pipx install osxphotos
  1. Once completed, create temp folder:
mkdir ~/osxphotosTemp
  1. Then run export command:
osxphotos export ~/osxphotosTemp --dry-run --download-missing --use-photokit --verbose

Command explanation:
osxphotos export – run export command. In our case we don’t need to perform actual export, that’s why we also adding --dry-run param
~/osxphotosTemp – we need to specify some folder for ‘export’. It’ll stay empty, since --dry-run param is provided
--dry-run – tell osxphotos to simulate the export process without actual exporting. Despite this, originals will still be downloaded from iCloud
--download-missing – our key to solving the issue – all missing photos and videos will be downloaded from iCloud servers
--use-photokit – Apple’s Photokit will be used
--verbose – make osxphotos display sync details

ℹ️ If you have a very large photo library, something could go wrong during command execution. You can re-run the command again and again until the whole library will be synced to your Mac.

🖥 Delete old Linux kernels in /boot partition

Sometimes one need to free up /boot partition, for example, to perform release upgrade using do-release-upgrade command. /boot partition may contain some outdated and unused kernels and here’s how to remove them:

Get current kernel

$ uname -r

Note: this kernel shouldn’t be deleted.

List all installed kernels

$ dpkg --list 'linux-image*' | grep ^ii

Manually delete all kernels except current kernel

$ sudo apt remove linux-image-<version>

Free up space

Finally, perform autoremove command to remove all unused files:

$ sudo apt --purge autoremove

Check free space:

$ df -h

🛠 Fix net::ERR_CONNECTION_CLOSED error for requests with large headers

By default, the Nginx server with enabled HTTP/2 protocol has 4KB limit per request header field. If you’ll try to send a request with a larger header, you can get net::ERR_CONNECTION_CLOSED or net::ERR_HTTP2_PROTOCOL_ERROR:

To fix this issue, update your configuration by adding the following params to your server section:

server {
  ...
  large_client_header_buffers 8 16k; # default 4 4k
  http2_max_field_size 16k; # default 4k
  ...
}
💡 Depending on your Nginx server version, required changes in config params can be different. Learn more on the official Nginx docs page: http://nginx.org/en/docs/http/ngx_http_v2_module.html

🌅 Convert HEIC to JPEG in one click (macOS)

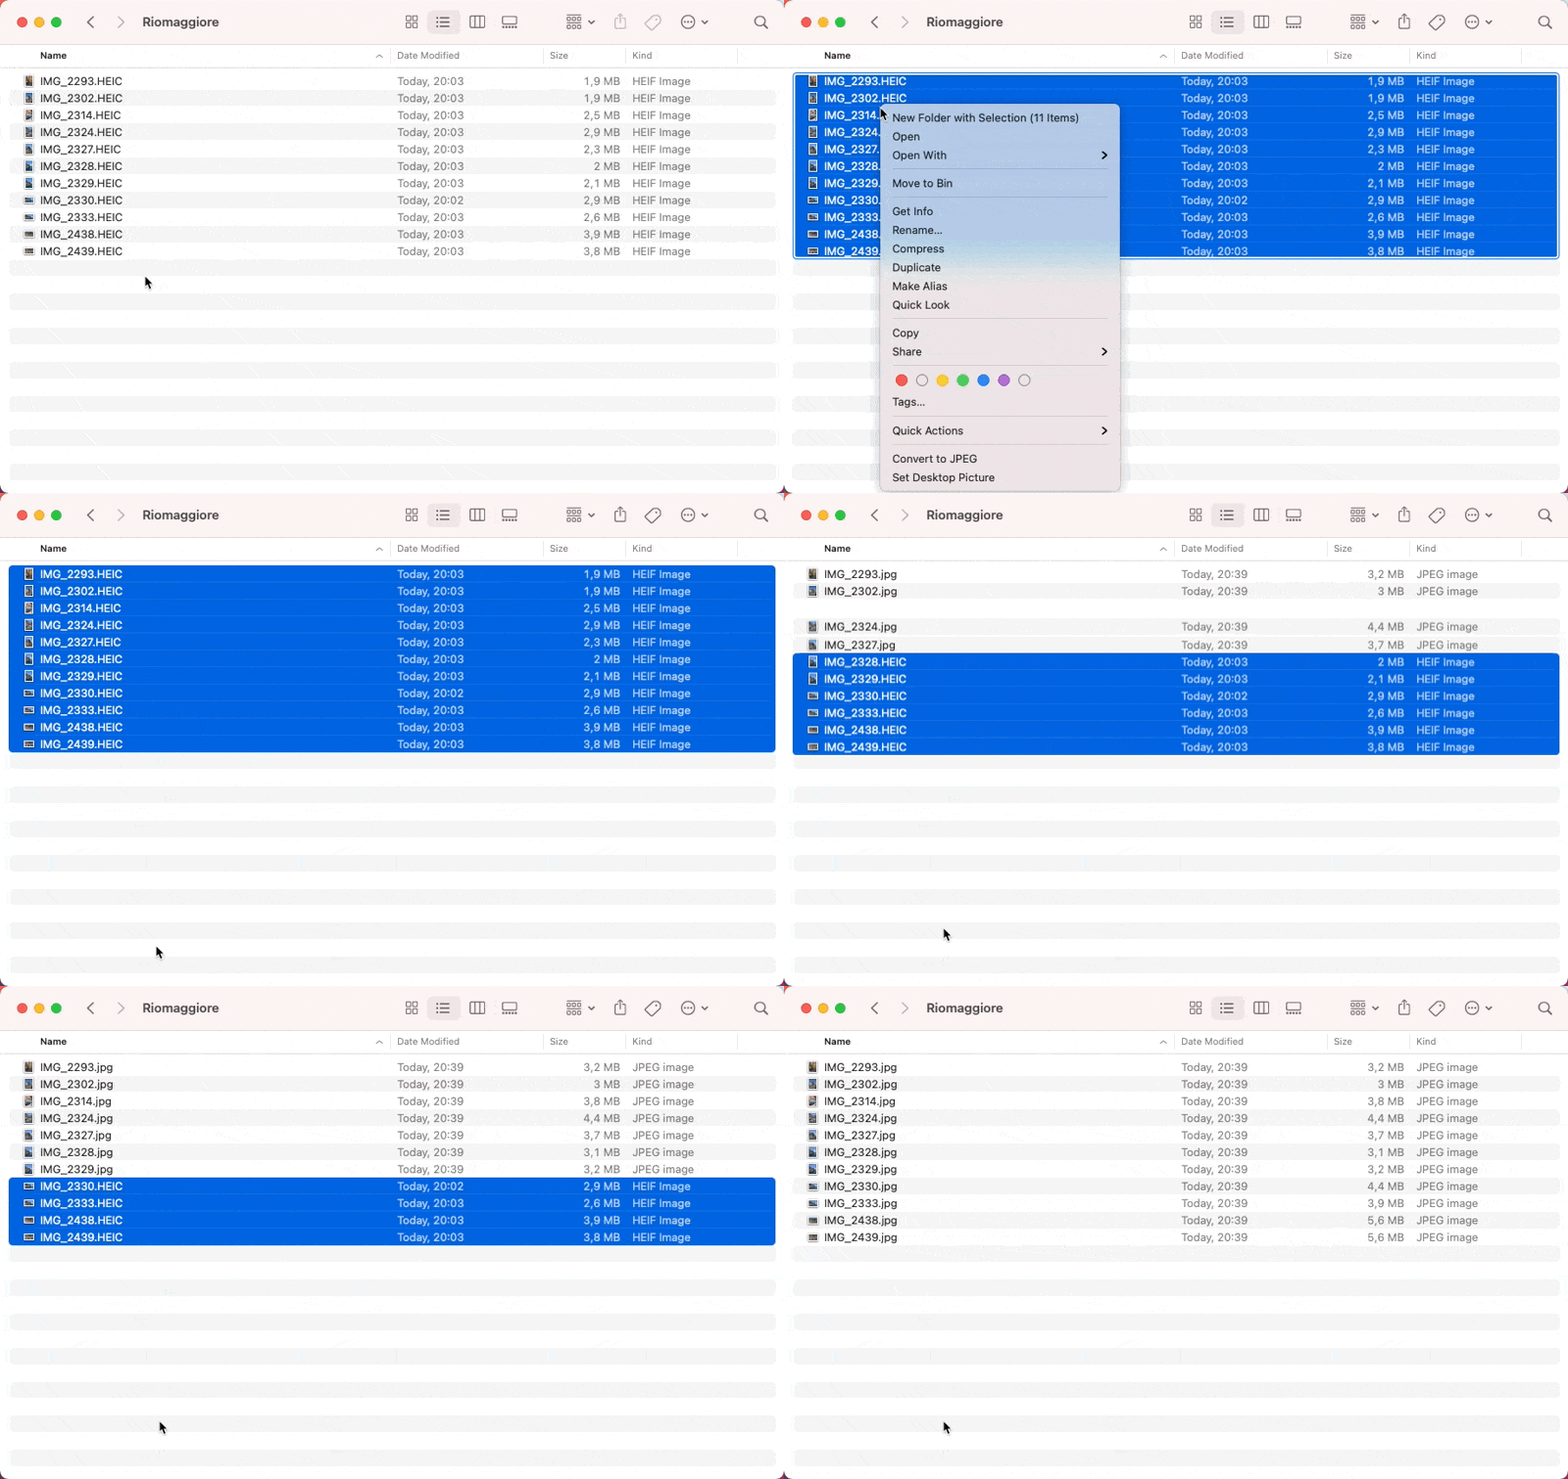
By default, photos made with the iPhone camera app are saved in HEIC format. Your Apple devices can work with HEIC files like a charm, however, there are still many cases when you may need to convert these photos into JPEG or other popular formats.

Fortunately, there is a simple way to do that with quick actions in the Finder context menu. Here is how we can add it.

  1. Open the Automator app
  2. Create a New document (select Quick Action as a type of document)
  3. Select the Photos category in Library
  4. Drag’n’drop Change Type of Images into Actions area
  5. The Alert window may suggest you add an additional action to copy the original files. If you want to save the original files, click “Add”.
  6. Select JPEG as the target format
  7. Select the type of files (Images) and application
  8. Save and select the name of the quick action

Steps 3-7 are explained in one screenshot.

As a result, you’ll get the “Convert to JPEG” action in the image context menu:

🎧 Create the best equalizer preset with iPhone & AirPods just for your ears

It’s a known fact that hearing gets worse with age. Did you ever noticed, that you want to tune your equalizer to hear as much details in music as possible? If so, described method could be useful for you.

It’s not a trivial task without knowing your audiogram. To measure it, one should perform hearing test called audiometry. Thanks to the progress in technology, now we can measure audiogram just at home. You still need to go to a special lab if you need to perform a professional hearing test, but roughly estimated audiogram is enough to play with equalizer presets. All we want to know is at which frequency our hearing is better compared to other frequencies. The most tests check hearing at frequency range from 125 Hz to 8 kHz.

Prerequisites

This method is the most suitable for those who have a hearing level below 100% of normal, and hearing loss is fairly similar for both ears. To get best results, your headphones/speaker should have relatively constant frequency response.
You can perform hearing test with almost any smartphone and headphones. If you want to get more accurate data, I recommend choosing only those devices with which hearing test application was calibrated.

Hearing test

There are many applications for a hearing test in the AppStore. I will use Mimi Hearing Test – it was calibrated for AirPods and has good UX.

Prepare

Find a quiet place and put on your headphones. Run application and start test. Mimi Hearing Test shows current noise level. Make sure it’s low enough. Ask your family members not to distract you during the test. Usually it takes up to 10 minutes.

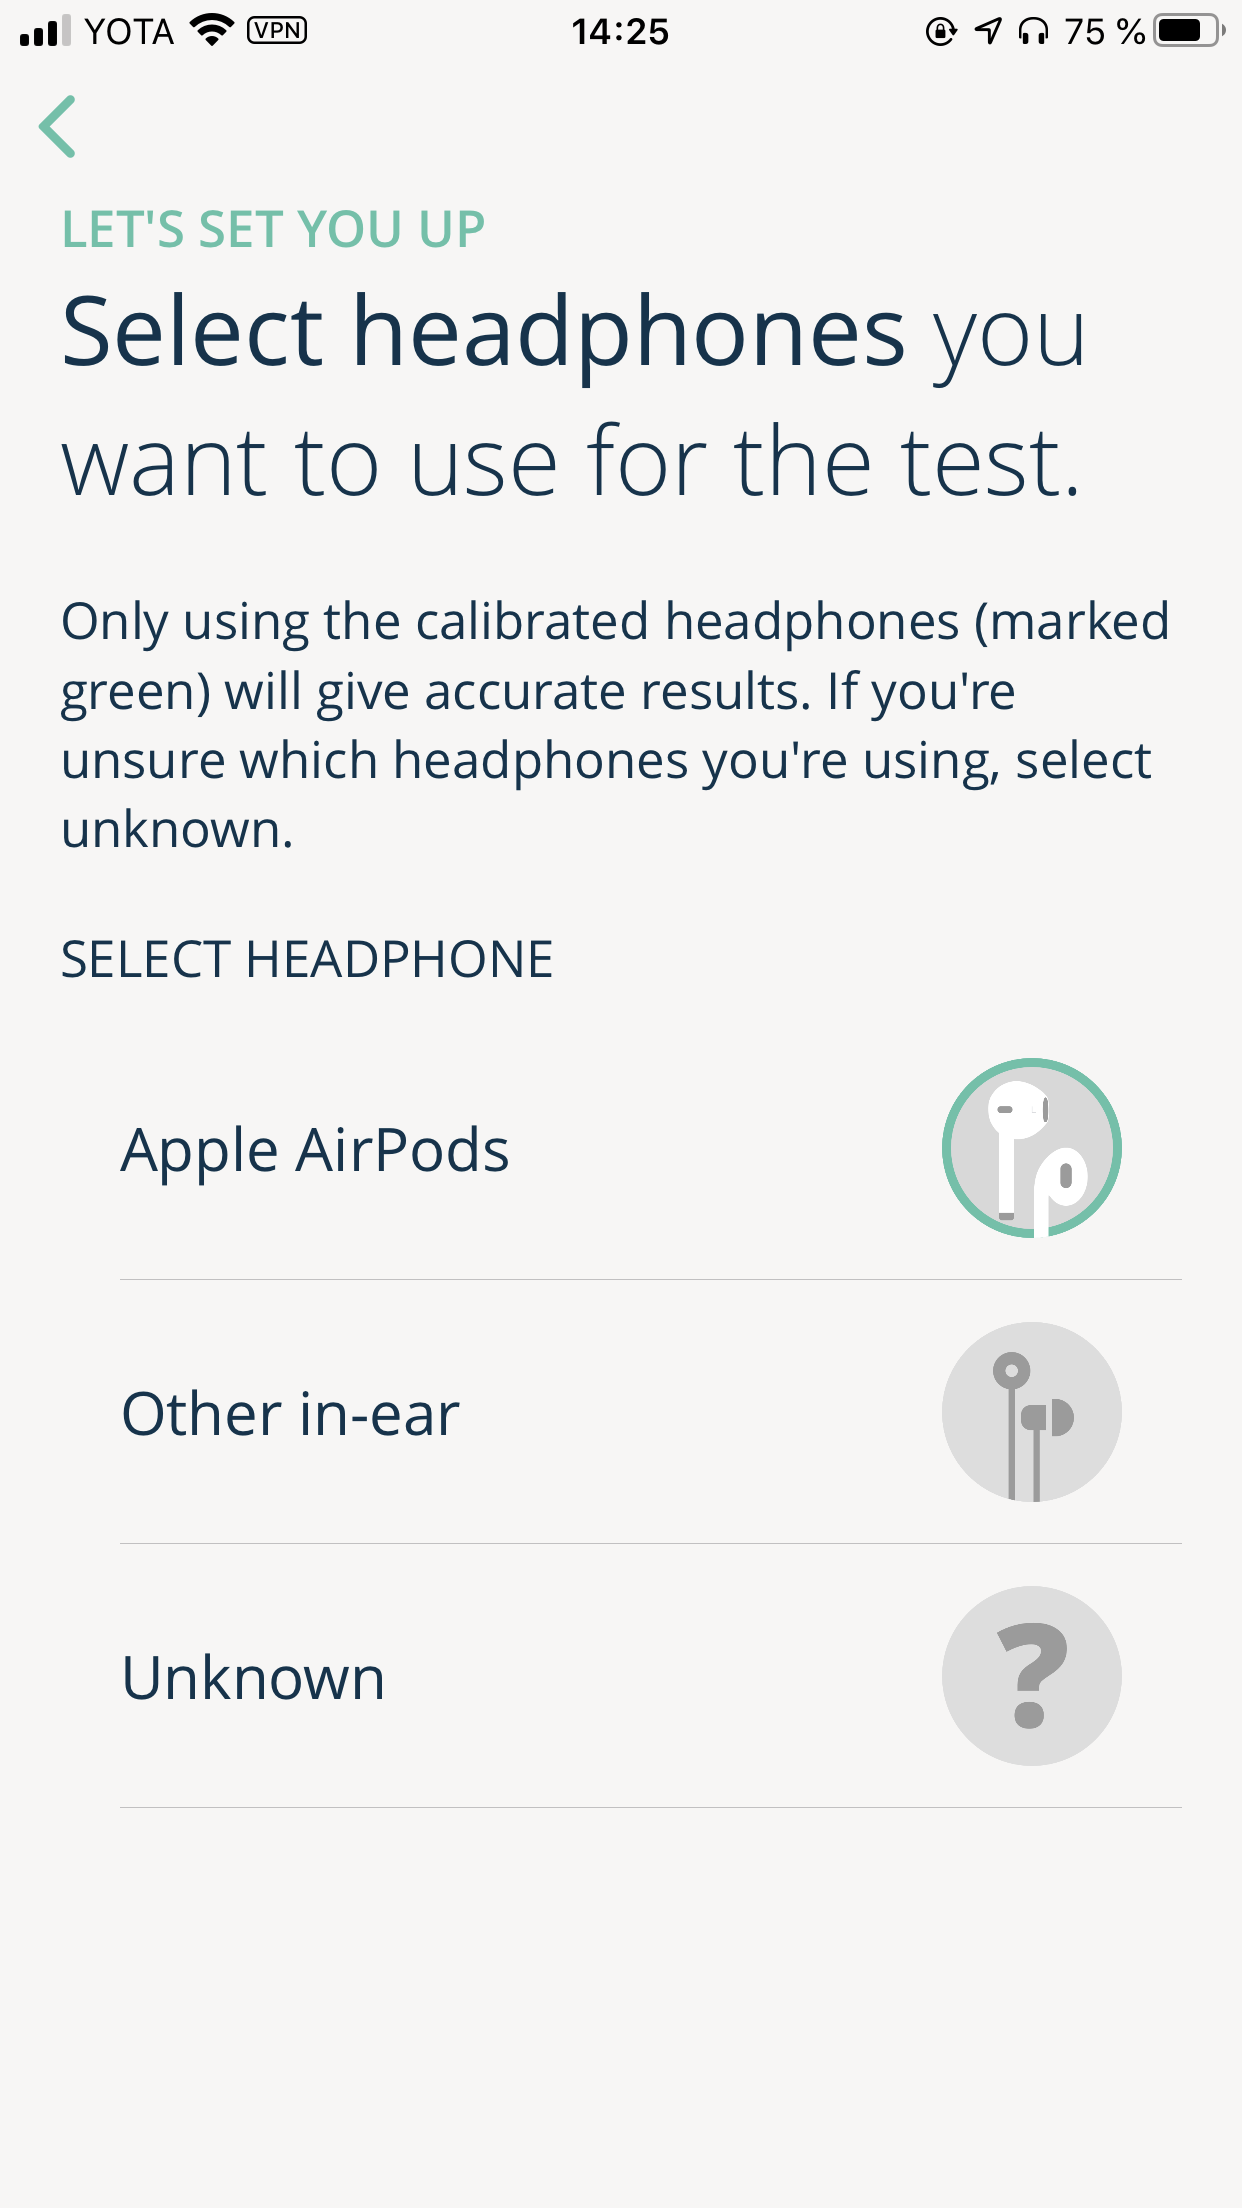
Select your headphones

Select your headphones type and then select a model. Calibrated headphones icon has a green outline.

Start test

Set you volume level to 50% using slider control and follow further instructions.

Interpreting results

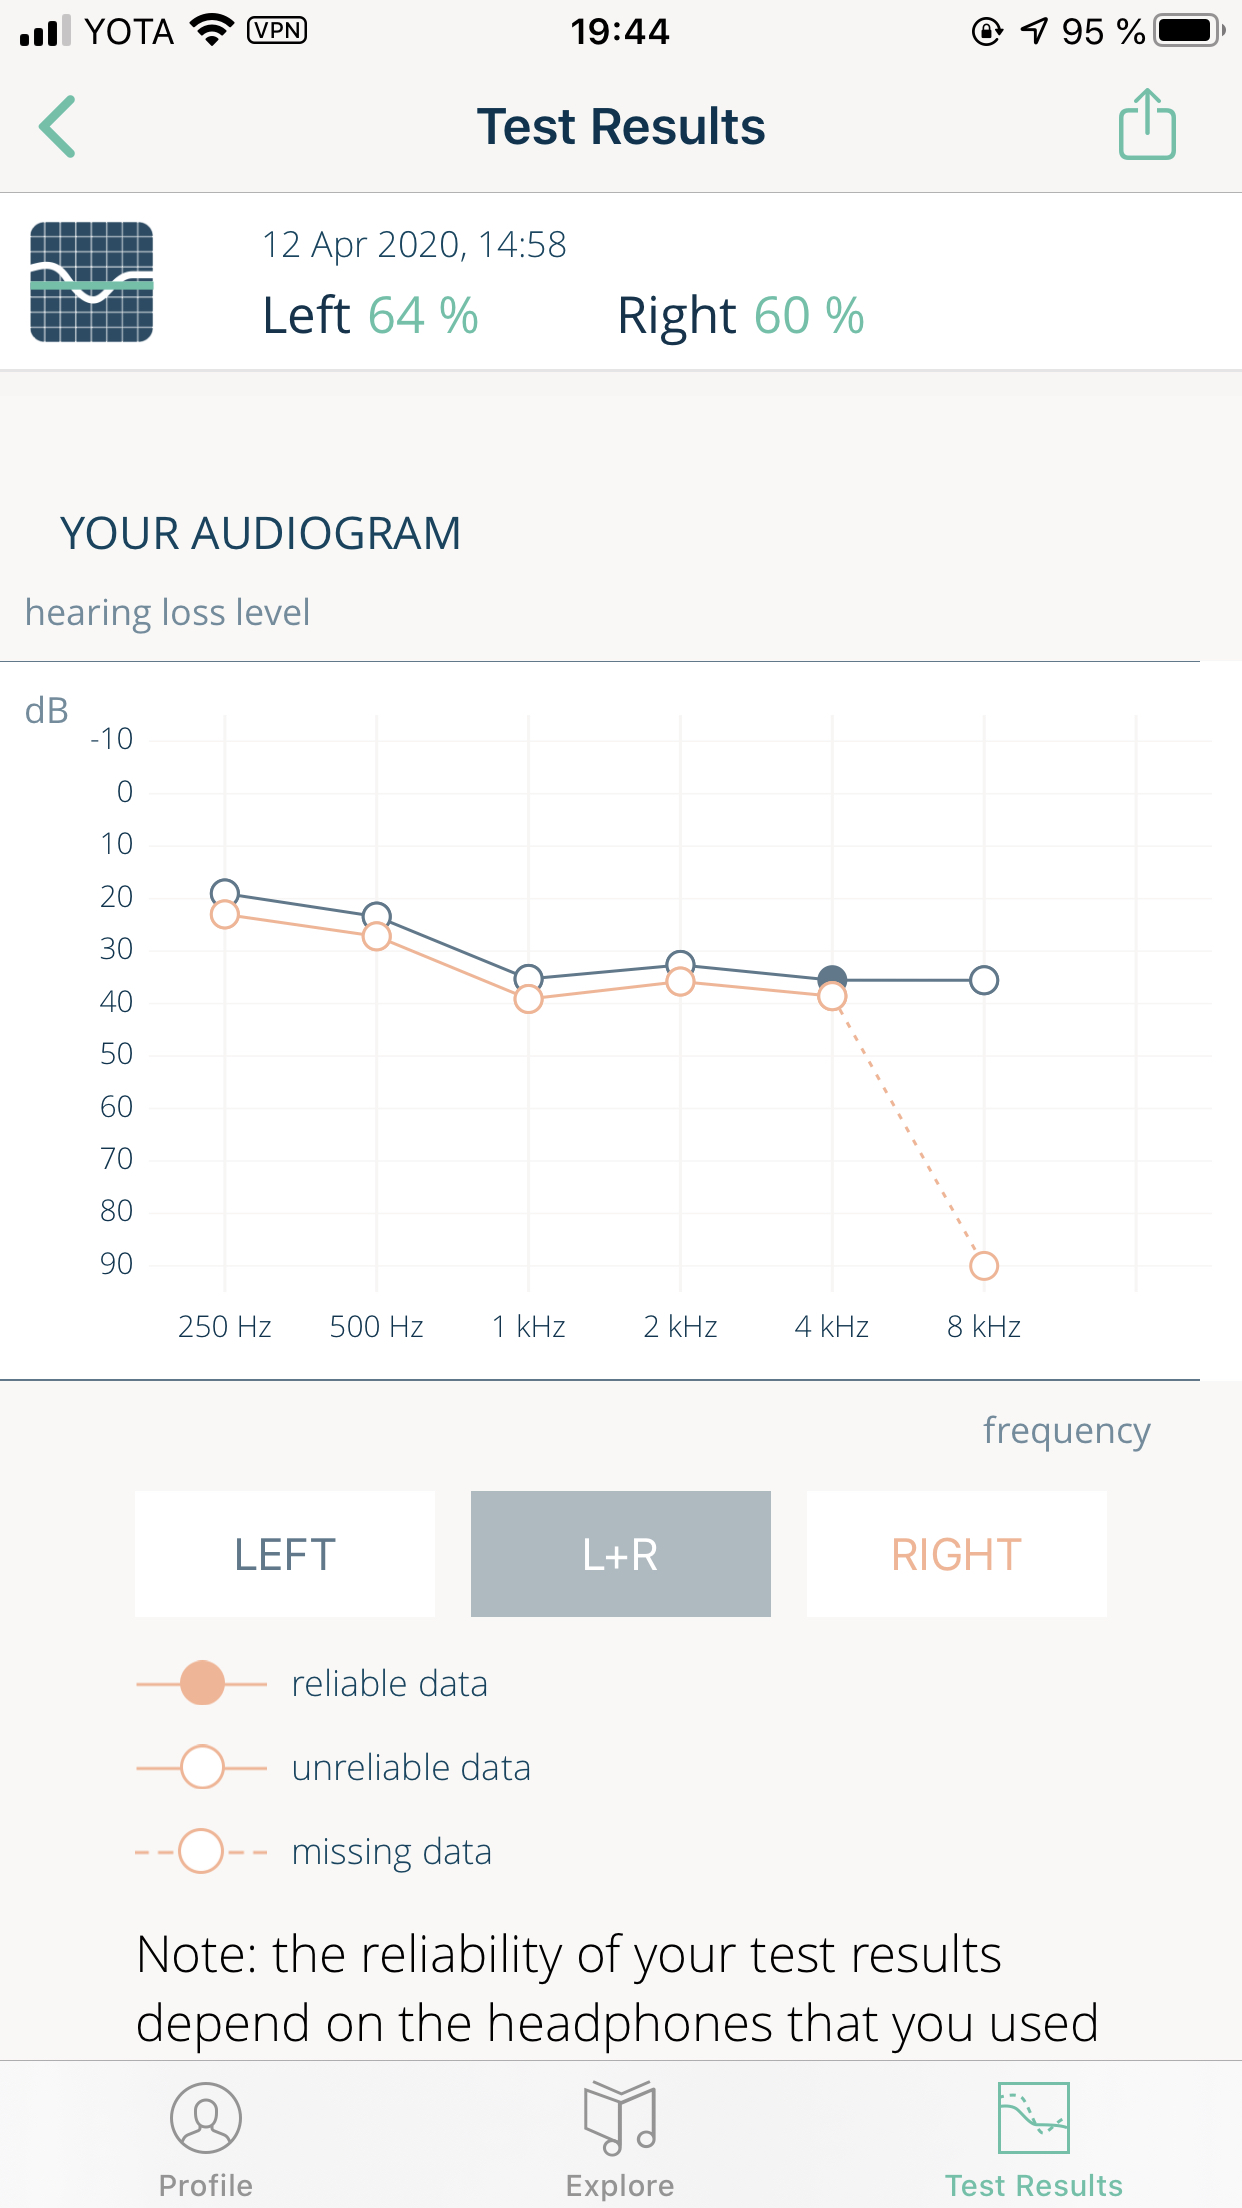
Once finished, you can find your audiogram in the Results tab. Let’s see how it can look like:

The higher the point, the better your hearing at the given frequency. When you have perfect hearing, all points will be at the 0 db level or even above this line (e. g. negative). If so, congratulations: you probably don’t even need to tune your equalizer to unfold the music you listen to. Or at least you should try different presets to your own taste.

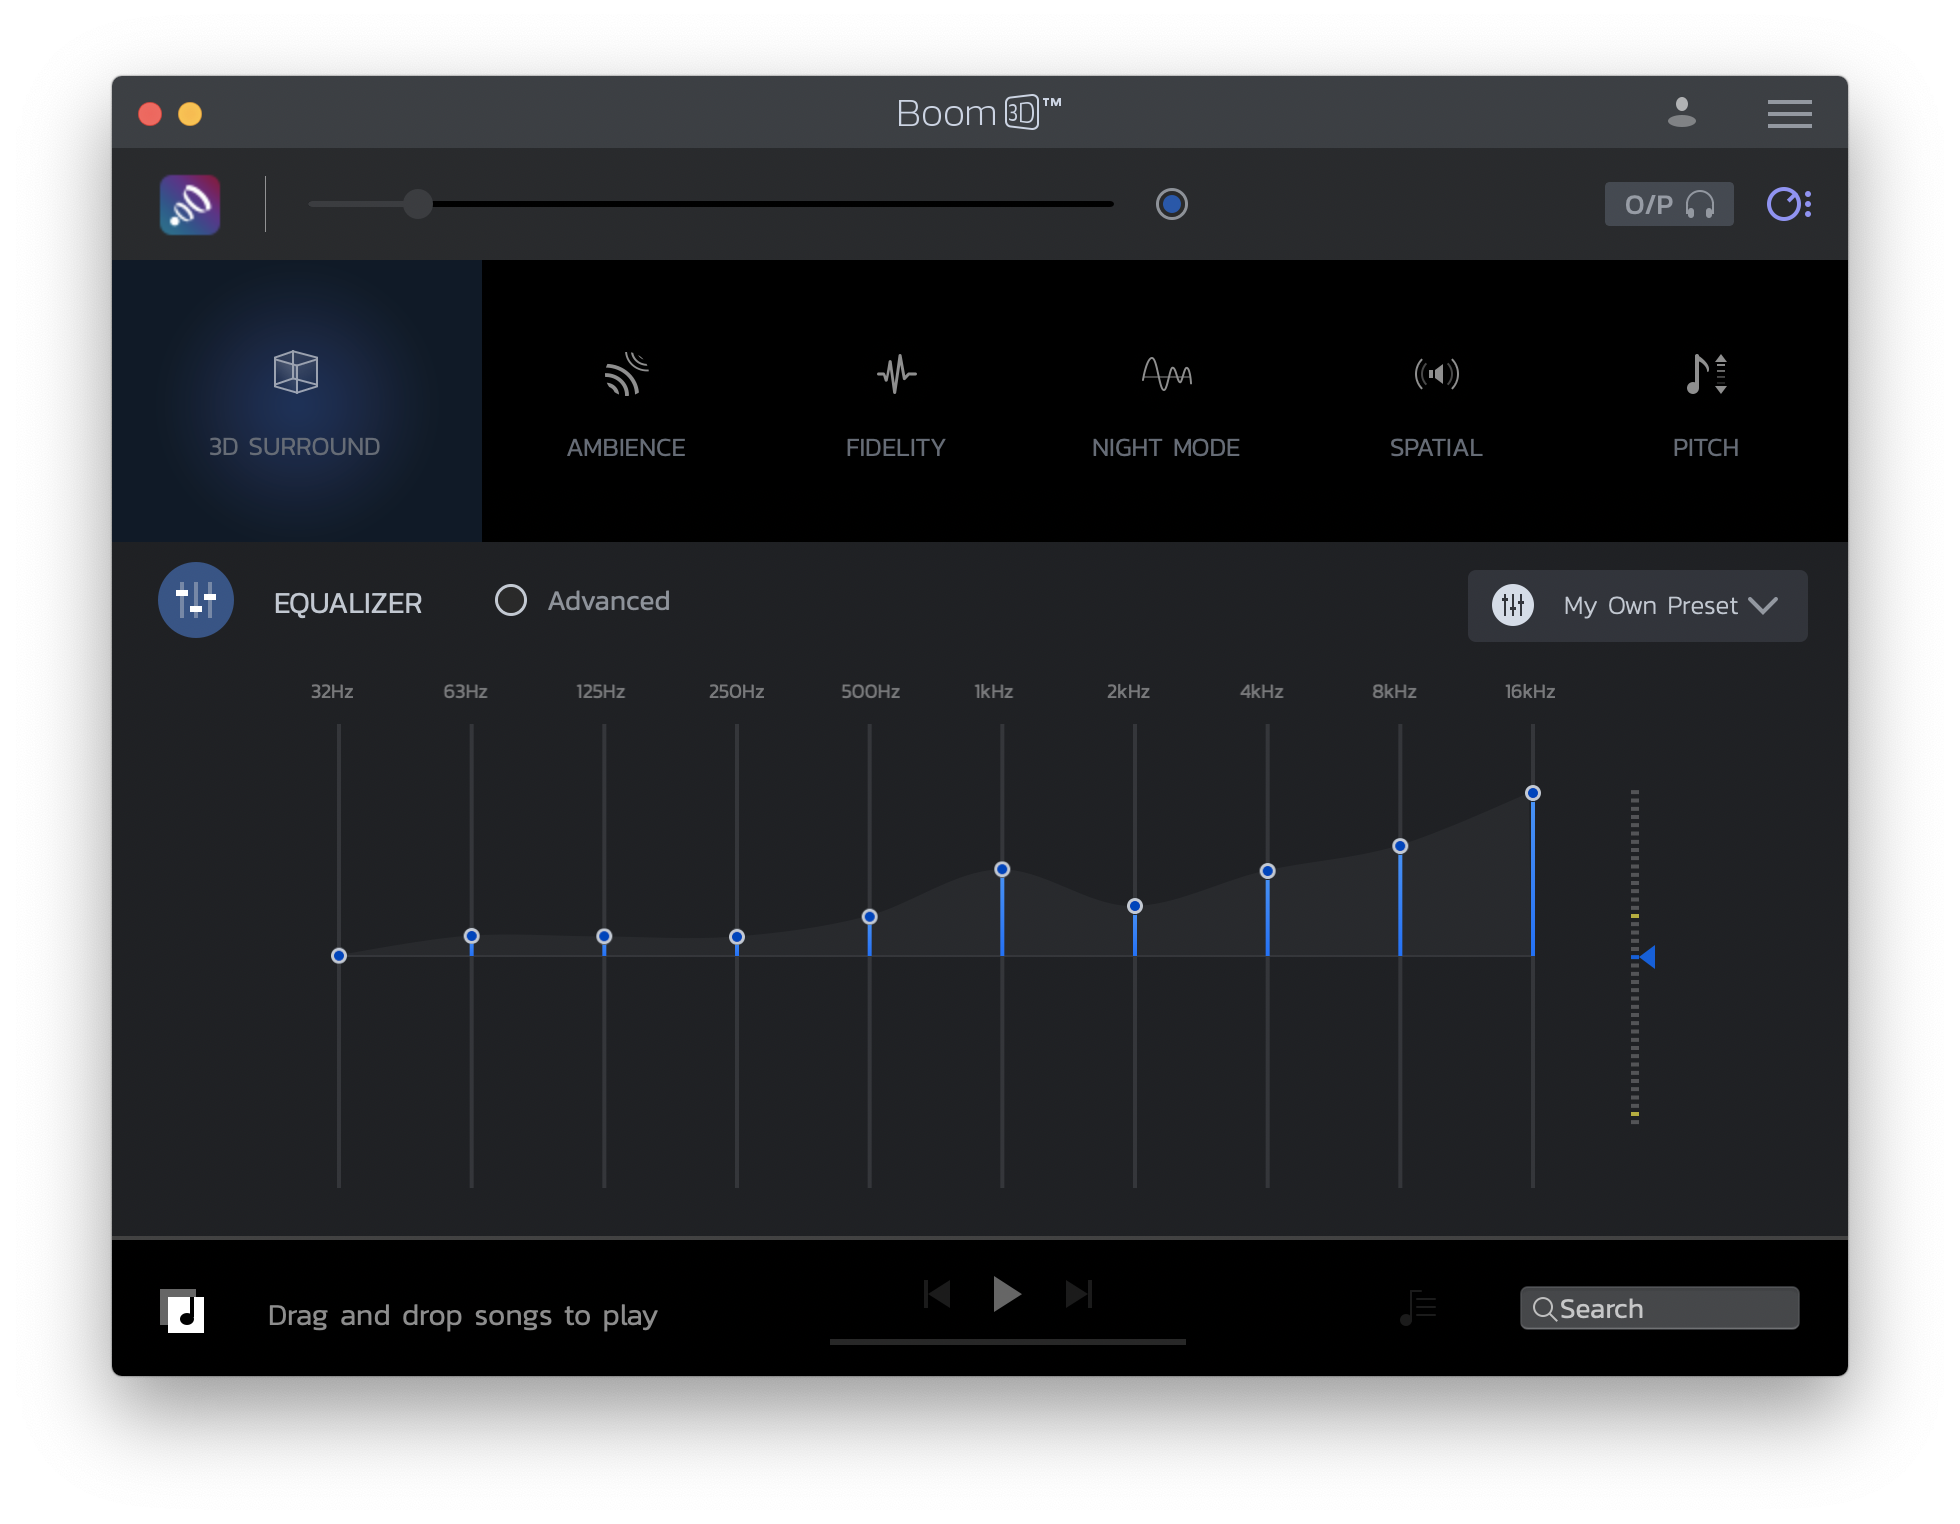
As you can see at the screenshot above, my hearing is far from perfect. If your hearing is not perfect as well, don’t be upset – at least, you’re not alone 🤗 Let’s try to get new emotions from music: